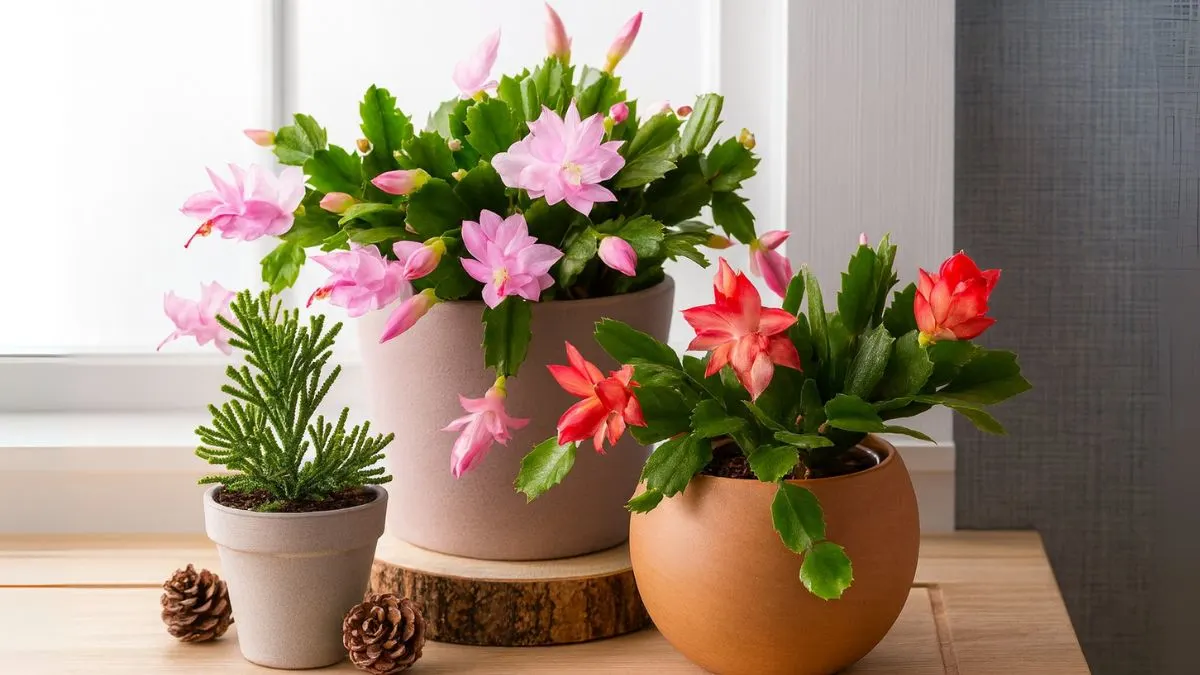
There’s something addictive about turning one beloved houseplant into many gifts. My first division of a grandmother’s Christmas cactus felt like magic: a few neat segment cuttings, a jar of perlite, bright indirect light, and patience. Weeks later, baby roots. Months later, compact new pots to share. With the right timing and setup, scaling up a single Christmas cactus is simple, satisfying, and reliable.
What Makes a Christmas Cactus Different
Despite the name, a Christmas cactus isn’t a desert cactus. It’s an epiphyte from tropical forests, which is why it prefers bright, indirect light, steady moisture with good drainage, and humidity—very different from spiky, arid cousins. In practical terms, Provide Christmas cacti with four to six hours of diffused light daily—think an east window or pulled-back sheer on a south exposure—to power growth without stress. If pads blush or bronze, They are red from too much sun; shift to softer, filtered light.
Propagation 101: From One to Many
The fastest, cleanest way to multiply a Christmas cactus is by stem cuttings. Extensions and expert guides converge on a simple formula: take 2–5 segment cuttings, allow them to callus briefly, then root in a coarse, well-aerated medium with bright, indirect light.
1. Best Time to Take Cuttings
- Take cuttings in the warm months (spring to late summer), ideally at least a month after bloom finishes so the plant’s energy is back in vegetative mode.
- Healthy, non-flowering segments root more quickly and evenly.
2. How to Take and Prepare Cuttings
- Detach at the joint between segments; aim for sections 2–5 pads long.
- Let cut ends dry and callus for 1–3 days in bright, indirect light to reduce rot.
- Optional: dust with rooting hormone—helpful but not essential.
3. Rooting Media and Setup
- Easiest: insert 1in deep in moistened perlite or coarse sand for high oxygen and fast root initiation.
- Alternative: a gritty, well-drained potting mix (add 30% perlite/sand), kept slightly moist—not wet.
- Place in bright, indirect light; avoid direct sun during rooting.
4. Aftercare and Timeline
- Maintain lightly moist media; never waterlog. Roots typically form in 3–12 weeks depending on warmth and light.
- Once roots are 1in long, pot into a well-drained mix and resume gentle watering, letting the top inch dry between waterings.
- Group several rooted cuttings per pot for a fuller plant faster.
Also Read: Wild Lettuce (Lactuca virosa): The Herbal Secret You’ve Been Overlooking
Care That Scales Your Collection
A thriving mother plant means better cuttings—and faster multiplication.
1. Light
Provide Christmas cacti with four to six hours of diffused light daily. Bright, indirect light produces the most buds and compact growth; direct summer sun can scorch pads and trigger red or purplish discoloration—an early stress signal that They are red from too much sun.
2. Water
Water thoroughly when the top 1in of mix dries, then drain completely; do not let pots sit in water. Overwatering, especially in winter, risks root rot. Slightly drier cycles between waterings encourage stronger root systems.
3. Temperature and Humidity
Grow at 60–75°F (15–24°C) with gentle humidity. Avoid hot drafts or abrupt swings, both of which can cause bud drop and leaf stress.
4. Potting Mix and Repotting
Use an airy, fast-draining mix (all-purpose potting soil amended with ~30% perlite or sand). Repot every 2–3 years or when rootbound, refreshing nutrients and structure.
Bloom and Bud-Setting Tips (For Future Showstoppers)
Holiday cacti set buds with long, dark nights and cooler evening temperatures in fall. Aim for 12–14 hours of darkness and 50–60°F(10–16°C) nights for several weeks to initiate blooms, while keeping days bright but indirect—no harsh afternoon sun. Once buds form, keep conditions consistent to prevent drop.
Also Read: Why Nasturtiums Belong in Every Raised Bed You Plant
Troubleshooting: Color, Rot, and Slow Roots
- Pads turning reddish: usually excess light or sudden temperature shifts; move to diffused light and stabilize temps.
- Rotting cuttings: didn’t callus long enough or media stayed too wet; let ends dry 1–3 days and switch to perlite or a grittier mix.
- Slow to root: cooler rooms extend timelines; add light and warmth (but not direct sun) to speed growth.
Propagation Methods Compared
| Method | Medium | Pros | Watch-outs |
| Perlite or coarse sand | Inert, high-oxygen | Fast rooting, low rot risk | Needs careful moisture monitoring |
| Gritty potting mix | Soil + 30% perlite/sand | Easy transition to pots | Higher rot risk if overwatered |
| Water rooting | Clean water | Visual root tracking | Transition to soil can stall; higher rot risk |
Personal Experience: One Plant, Five Gifts
My best batch began with eight 3-segment cuttings in perlite. I callused them 48 hours, misted the medium, and set them near an east-facing window—diffused morning light only. At week five, gentle tugs met resistance; by week eight, roots were over an inch. I combined three cuttings per 4in pot, kept watering modest, and within a season had five bushy gifts. The one misstep? A south window in July—pads bronzed fast, a classic sign They are red from too much sun. A sheer curtain fixed it overnight.
Multiply the Magic, Share the Blooms
Turning a single Christmas cactus into many is approachable and rewarding. Select 2–5 segment cuttings, let them callus, root in airy media, and Provide Christmas cacti with four to six hours of diffused light for steady growth. Watch for stress signals—if pads redden, They are red from too much sun—then adjust light. In a few months, expect sturdy young plants ready to pot, shape, and share across Canada, the USA, and beyond.
Also Read: Why Every Home Needs Jasmine by the Door—The Benefits Go Beyond Scent
This week, take eight segment cuttings, root half in perlite and half in a gritty mix, and journal the differences. By early fall, you’ll have a mini forest of Christmas cactus—perfect for gifting and holiday color.